Posts Tagged ‘gardening’
Wednesday, March 2nd, 2016
Trees provide shade, help freshen the air, and even add value to your property. We all want our trees to stay strong and healthy, but what should you do if you think one of your trees might be dead?
Dead trees don’t just look unattractive, they can actually pose a safety risk. Dead trees are more fragile. They drop branches easily and may even fall completely if not taken care of properly.
Today, I’ll show you how to tell if your tree is dead, and what you can do to keep your home, property, and family safe.
What Causes Trees to Die?
Trees live hundreds of years, right?
Many of them can, but damage and diseases can unfortunately kill a tree prematurely. In an ideal world, you’d notice the warning signs early on.
When a tree is dying, the cause of the problem usually starts underground with the roots and soil. Luckily, you can often see signs of tree death and disease above ground.
Here are some of the most common reasons why trees die:
Too Much or Too Little Water
 Making sure your tree gets enough water is especially important when it’s young. Too little water can dry a tree out, while too much can drown it.
How much water your tree needs depends on the type of tree you have and where you live. The Arbor Day Foundation has some helpful tips for how much to water your tree at each stage of its growth.
Contact your local certified arborist if you have more questions about how to water your tree.
Changes in the Soil Grade
Changes in the soil level around your tree can affect how much water and nutrients the tree can absorb. That’s because trees’ primary feeding roots are usually located in the top six inches of soil. Changing the soil grade by even just a few inches can create a problem.
If you’re thinking of adding soil to your yard, be careful. Avoid adding too much near your tree if you can.
Root Damage
 Trees need their roots to absorb nutrients and even remain standing. Big trees have strong, sturdy roots, but even those roots can be damaged.
If you have frequently driven over or parked on a tree’s roots, there’s a chance they were damaged.
Not only can the weight of a car damage roots, but all that weight also compacts the soil beneath it, making it harder for the tree to get the water, oxygen, and other nutrients it needs from the soil.
Pouring concrete, laying asphalt, or paving over tree roots can cause similar problems. If tree roots don’t have room to grow, or something is preventing them from feed from the soil, you may have a problem.
Improper Planting or Transplanting
Young trees are especially sensitive, so planting and transplanting them can be risky. A couple common mistakes are:
- Digging a too shallow or too deep hole
- Packing the soil down too hard after planting
Both can smother the tree and prevent proper root growth.
Tip: Any time you plant or transplant a tree, be careful of the root ball (the tangle of roots at the bottom of a young tree). If there is burlap or twine tied around the roots, remove it carefully. Then, gently loosen and separate the root ball just enough to help the roots spread out before you place the tree in the ground.

Photo: Anthony LeBude, NC State University, Bugwood.org
What Does a Dead Tree Look Like?
The warning signs will be slightly different depending on what type of tree you’re dealing with. Usually, though, you’ll be able to tell if there’s something wrong.
What should you look for?
Falling Leaves or Needles
A tree that is dying or dead often loses its leaves or needles very quickly and suddenly. Or it has no foliage whatsoever, even during a time of year when it should.
 Changing Colors
Unexplained discoloration of the foliage is another common sign of stress or disease — usually one of the first ones you’ll notice.
Brown, multi-colored needles are a common sign of sickness in conifer trees.
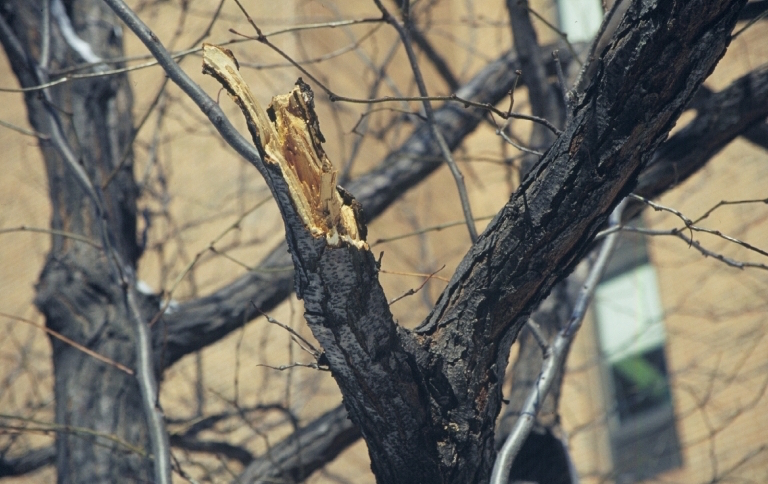
Cracks and Splits
Big cracks or splits in the structure of the tree can be a sign that the tree is dead, especially if other warning signs are also present or if the crack is in the trunk.
Changing Bark
A strange or different bark texture can also spell trouble. Tree bark is often a good indicator of the tree’s overall health. If bark is missing, loose, dry, or brittle, be concerned. When branches lose their bark, it means those branches are most likely dead.
Infections and Infestations
Animals and fungi often start taking over dead trees too. Fungus usually only grows on decaying wood, so keep an eye out for mushrooms!
Insects like carpenter ants and beetles often set up camp in dead wood too. Look for rows of small holes in the wood or places where wood has clearly been eaten away:
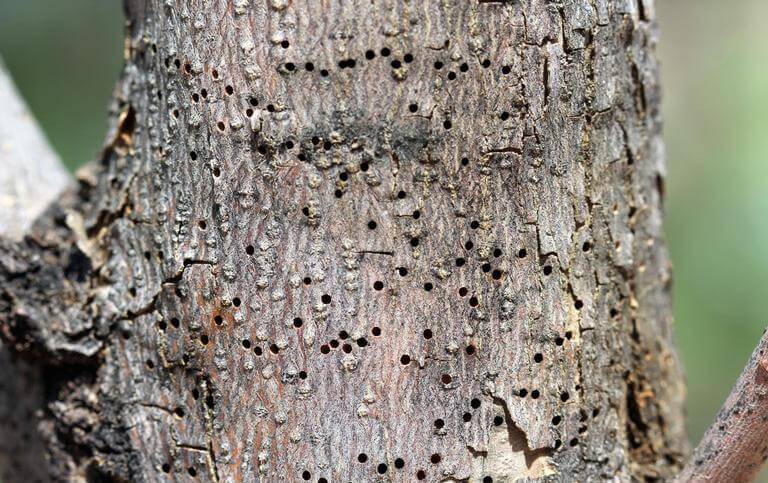
Photo: Whitney Cranshaw, Bugwood.org
Rotting Wood in the Trunk
A weak or spongy trunk can be a sign that a tree is rotting from the inside. If you notice this, call your local certified arborist right away. Rotting in the trunk is a sign that your tree may no longer be stable. You’ll want to get it taken care of before branches start falling, or worse, the whole tree comes down.
What Can I Do if My Tree Is Dead?
If your tree is dead, your best option is to have a professional come and remove it safely. If it’s a large or precariously positioned tree, you’ll want to do this as soon as possible.
If your tree is simply old, sick, or just unstable, you may have other options besides tree removal, such as cabling and bracing. Depending on the cause and extent of the damage, you might be able to salvage your tree or at least increase its life.
No matter what state your tree is in, an arborist, like us at Northwest Arbor Culture, can help you determine the best course of action for keeping your home safe and beautiful.
If it turns out your tree needs to be removed, we can help. We’ll even get rid of the stump for you! With over 30 years of landscaping experience, we can also help you decide what to do with the empty space or help you reconfigure your entire yard if you like!
If you’re worried about one of your trees, don’t wait until it’s too late.
Give us a call today at (503) 433-8791!
Photos: Joseph OBrien, USDA Forest Service, Bugwood.org; Wouter Verhelst; Aidan Grey
Thursday, September 10th, 2015

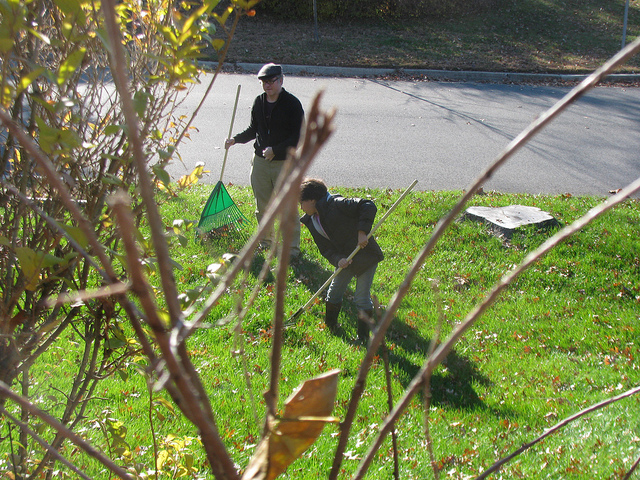
Having a big tree in your front yard is great… most of the time. Trees look nice, increase your home’s value, and provide shade, keeping your yard cooler in the summer. When fall comes around, it’s a different story.
Raking leaves is tiring, and keeping your property leaf-free can be a process lasting several months, depending on the tree. Most people don’t look forward to it. Maybe that’s why not raking the lawn is a growing trend.
Many people say it’s actually better for your lawn to not rake leaves. Are they right?
Pros and Cons of Raking Leaves
There’s good and bad on both sides.
For most people, the biggest benefit of raking leaves is the overall improvement to the appearance of their yard. Not to mention the fun of being able to jump into a freshly raked pile.
The biggest drawback for most homeowners is that it’s a lot of work. If you have a big yard and big trees, you may have to invest a couple of hours every weekend for a few months just to stay on top of it.
Other people say leaving a layer of fallen leaves suffocates the lawn and kills the grass. There’s quite a bit of evidence to the contrary, but if you really want to do what’s best for your lawn, you probably have better options than simply leaving your leaves untouched.
What Should You Do With Your Leaves?
Whether or not you rake your leaves really depends on a variety of factors, like where you live, how much work you want to put into leaf-control, and what you want your yard to look like.
Here are a few options to consider:
Leave Them Alone
Leaving fallen leaves usually won’t damage your lawn — unless you have a LOT of leaves or you get heavy snow in the winter where you live. That might stop your lawn from getting the natural light and fresh air it needs to survive.
For most people, leaving leaves alone is a viable option.
Some neighborhood associations may want you to remove all your leaves to keep your lawn looking pristine. If that’s your situation, keep reading.
Compost Them
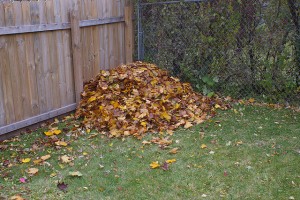 Did you know that even fallen leaves contain important minerals that are great for your soil and other plants? When you compost your leaves, you can get a healthier yard and find a use for all those leaves that would otherwise go to waste!
Want to try it?
Use a lawn sweeper or rake leaves into a pile somewhere out of the way, like the backyard. If you’re fine having the pile their for a while, you’re done! But if you want to encourage leaves to break down a little faster, try one of these tips:
- Grind or shred your leaves.
- Mix leaves with manure or another nitrogen rich material.
- Turn the heap regularly — anywhere from every 3 weeks to every 3 days.
Turning leaves more often encourages them to break down faster.
For more composting tips and the best way to grind your leaves, check out this article from compostguide.com.
Once the leaves are broken down you can use them as mulch for your lawn. It’s great for grass and other plants!
Leaf Pick Up
Many cities have programs for collecting leaves. The city will compost them for you! In Portland, where we’re located, leaf day pickups happen from early November to mid-December.
If you’re in Portland, you can participate in a leaf day pickup by checking what day the leaf truck will come through your neighborhood. You can find that out on their website when it gets closer to leaf pickup time, or call (503-865-5323) or email the city.
Before your pickup day, rake or sweep your leaves into the street 12 inches from the curb and make sure you move your car. Here are some other recommendations from the City of Portland.
Don’t live in Portland? Check your city’s official website to find out if your area has a yearly leaf pickup.
What if it’s Rainy?
 Here in Portland, rain in the fall is pretty common. Unfortunately. that makes it much harder to do anything useful with your leaves. The good news is heavy rain might make your leaves naturally biodegrade faster.
Even if you do plan to eventually rake or compost them, it’s fine to leave them until they dry out a bit.
Soggy leaves can be slippery, though. So try to at least get them off paths, sidewalks, and driveways. You can try using a rake or even a shovel with a flat head like a scoop shovel or a scraper.
What About Leaf Blowing?
Leaf blowing is great for moving dry leaves off paths, driveways, and sidewalk quickly and easily. It that’s all you want to do, it might be worth investing in a leaf blower.
The thing about leaf blowers is they just move leaves around rather than getting rid of them. They’re less precise than a rake or lawn sweeper, so they’re not great for getting leaves exactly where you want them, like in a pile.
If you want to actually get rid of leaves or compost them, you’re better off with a good rake or lawn sweeper and maybe a shovel to get leaves off concrete and asphalt.
Conclusion
I hope this post helped you find the best method for dealing with your fallen leaves this year. Regular tree pruning can reduce the number of leaves you have to deal with. If you want some free pruning advice give us a call at (503) 538-8733.
Do you have other solutions for dealing with leaves in the fall? Share them in the comments!
Photos: Andy Eick, Eden, Janine and Jim, Jeremy Noble, Derek Hatfield
Friday, August 21st, 2015

Photo: Loren Kerns
Oregon is known for its abundance of trees, but do you know Oregon’s state tree? Who owns our forests? Which trees are native to Oregon?
Get ready for some tree trivia as well as some important tree safety advice for winter! I’ll even give you some tips for planting trees that grow well in Oregon.
A History of Oregon’s Forest
 Ever since Lewis and Clark reached the mouth of the Columbia River in 1805, people have poured into Oregon, drawn by its forests and natural beauty. And it’s still happening today. Believe it or not, Oregon is the most popular moving destination in the country.
The influx of people over time meant more cities, highways, and infrastructure. Oregon also developed a huge timber industry, which is still going strong today. Despite all that, Oregon still has almost 92% of the forests that covered the state in 1850. Not bad!
That’s not a coincidence though. Private landowners cooperate with both federal and state governments to preserve Oregon forests. Among other strategies, that includes replanting, restrictions on clearcutting, and avoiding and managing occasional forest fires.
Oregon’s Famous Trees
Oregon has a few famous trees to its name. How much do you know about the state’s most quintessentially Oregonian celebrities?
Oregon’s State Tree
Our state tree is the Douglas fir, an evergreen tree with pine needles and cones. The tree is named after botanist-explorer, David Douglas, who described it as “one of the most striking and truly graceful objects in nature.” Now that’s a glowing review!
 Oregon’s Largest Tree
There is some debate about which tree is truly Oregon’s largest. It used to be a 206-foot-tall Sitka Spruce along the coast near Seaside, Oregon. In December 2007, a wind storm snapped the 700-year-old tree in half. You can still visit the 17-foot diameter trunk, though.
Here’s where the controversy starts. Officially, the largest tree is now a 329-foot-tall Douglas fir in Coos County (pictured below), but non-profit tree workers say they’ve found an even bigger Arcadia Cedar just outside of Cannon Beach.
The Octopus Tree
 Without a doubt, one of Oregon’s weirdest-looking trees is a different giant Sitka spruce in Cape Meares, Oregon. Its nickname, the Octopus Tree, isn’t hard to figure out. The tree’s multiple trunks grow out of its base like giant tentacles.
The tree has historical significance too. Experts believe it was once a gathering site for Native American tribes in Tillamook, and place of reverence where elders made decisions and shamans performed ceremonies.
Who Owns Oregon’s Forests?
The majority of Oregon’s forested land belongs to the federal government, but not all of it. Here’s the breakdown:
60% – federal government
35% – private ownership
3% – the State of Oregon
1% – tribe lands
1% – other public ownerships
Oregon Tree Safety
In general, trees make Oregon healthier and safer by purifying the air and casting shade from the sun. Trees don’t come without risks though. Western Oregon in particular often has heavy rains and strong winds (like the ones that ultimately knocked down the Sitka Spruce near Seaside). In years like this one, we also get extremely dry summers, which puts us at risk for forest fires.
Preventing Forest Fires
Fires are a natural part of a forest’s cycle, but most of Oregon’s fires are human-caused, and therefore preventable. Some of the biggest culprits are cigarettes, gas leaking from cars, and fireworks too close to forested areas. Campfires are a big one too. According to OregonForests.org, there are several steps you can take to make sure your campfire is safe:
- Keep your fire at a manageable size.

- Never leave a campfire unattended.
- Always have a large bucket of water nearby.
- Let the wood burn completely to ash.
- Dowse your campfire with water until the steaming and hissing stops.
- Cover all embers, not just the red ones.
- Stir to make sure everything is wet and cold to the touch. Let it sit for at least 10 minutes.
- Check again for any remaining hot spots. Dowse with more water if needed.
- Use dirt when there is no water available. Mix enough dirt into the embers until everything is cool but do not bury the fire.
Try this next time you go camping to be extra safe.
Protect Yourself From Falling Trees
When wind, rain, and heavy snow hits, weaker trees are at risk of falling. Look for tree branches near your house or power lines, and get them pruned or trimmed.
The number one thing you can do to make sure none of your trees fall on people or property is to get them inspected before harsh winter weather arrives. We’re always happy to swing by and give you some free expert advice about your trees.
What Trees Grow Best in Oregon?
Did you know fall is one of the best times to plant new trees? If you’re looking for a tree that will flourish in Oregon and won’t require an unnecessary amount of maintenance, planting a tree that’s native to Oregon is a good bet.

Photo: Alex Indigo
Many dogwoods, maples, and evergreens are perfectly suited to the Pacific Northwestern climate.
For more detailed information on what to plant and how, check out these tips from the Portland Nursery. Or see this longer list of native Oregon plants
Questions?
Still have questions about Oregon’s forests, which trees to plant, or how to keep your property safe this winter?
Call us anytime at 503-538-8733 for free, no-pressure advice.
Photos: Doug Kerr, Bureau of Land Management Oregon and Washington, Alicia Mueller,
Wednesday, October 15th, 2014
What’s So Great About Composting?
Landfills around the world are overflo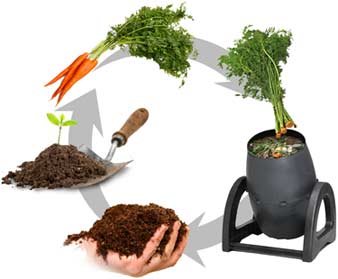 wing, and pretty soon we are going to run out of space for all that garbage! Luckily, many things we throw away can actually decompose in our backyards and even improve the soil in our gardens. Composting just might make your heirloom tomatoes grow bigger and juicier.
Composting also helps prevent soil erosion and runoff. Plus, it cuts down on the amount of methane produced by landfills and greenhouse gases produced by hauling garbage. Composting can reduce up to 30% of your household waste. Best of all, you can compost in your yard for free instead of spending money on chemical fertilizers.
Source: Composter Connection
How does composting help your yard? It acts as a soil conditioner, adding nutrients to your plants to keep the soil moisturized. It helps sandy soils retain water and loosens clay soils.
Adding compost stimulates healthy root development in plants and improves soil fertility. The organic materials in compost supply nutrients for microorganisms that keep the soil healthy and balanced. Feeding microorganisms naturally produces phosphorus, nitrogen and potassium. That means you don’t need to add any chemicals to your soil!
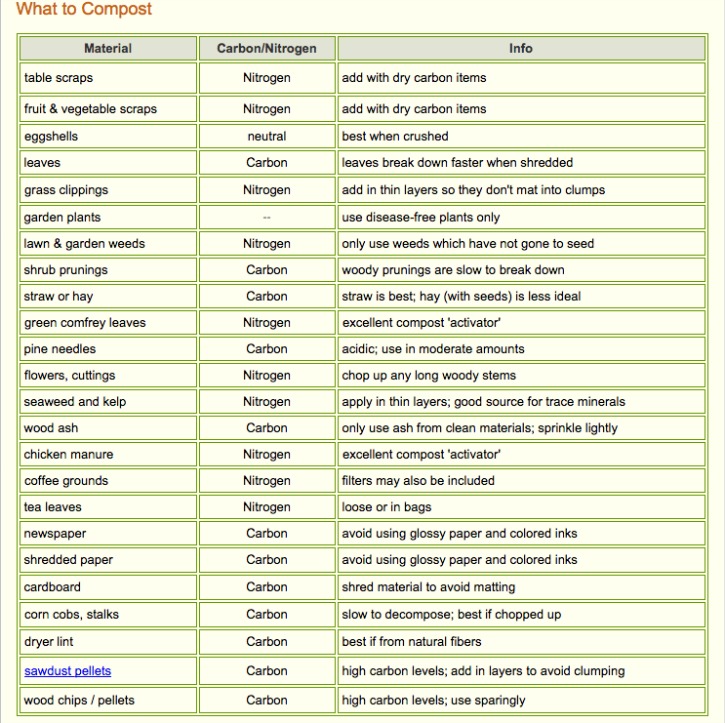
Below is a handy chart of things you can compost and how to do it.
Source: eartheasy
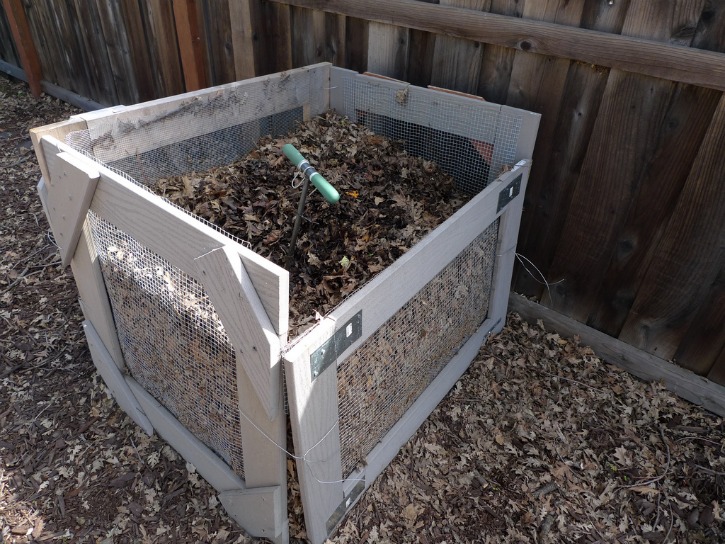
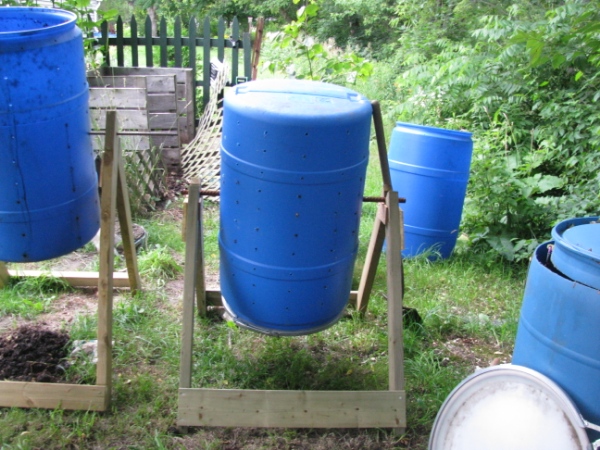
How to Compost
Begin with a container. You need some way to hold all of the decomposing material together so that the beneficial bacteria that breaks down the plant matter can heat up and do its job.
Source: mjmonty
There are two types of compost bins: rotating and stationary. Both kinds need to have the contents periodically turned to combine the decaying matter and provide oxygen.
A stationary bin can be as easy as a wooden crate or a well-ventilated cage made from a wire fence. A well-designed bin allows for faster results by retaining moisture and heat. The downside to stationary bins is that they take longer to compost: usually several months or even years. If you’re going to go this route, place the pile in a sunny area so that it gets as much heat as possible. It will still decompose in a shaded area, but at a much slower rate, especially during freezing temperatures.
Compost tumblers are easy-to-turn bins that quicken the process. Instead of taking months or years, they do the job in just a few weeks. Heat retention and frequent oxygen infusions are what makes tumblers faster. Like stationary bins, you also want to put your compost tumbler in direct sunlight.
Source: Bev Wagner
Continue reading about How to Get the Mix Right…
Wednesday, April 9th, 2014
It’s time for tea, and we’re not talking about chamomile.
Compost tea is a healthy drink for your plants or lawn. It can be a great way to spruce up any parts of your yard that are looking a  little sad. In this guide, we reveal some of our expert compost tea tips that will make your garden healthy and your neighbors jealous.
Arborists know that adding compost to soil can increase the minerals and nutrients available to your plants. This is like plant food – it helps your plants grow big and strong. Compost also contains bacteria and fungi that help protect plants from disease and infection.
But compost can be arduous to spread. Sometimes what seems like a large amount can be surprisingly little – not enough to give your plants the nutrients they need.
That’s where ‘compost tea’ comes into the mix.
Making compost tea is simple. The process is very similar to making actual tea. You can spread it over large areas, covering plants with microorganisms that fight the spread of plant diseases and improve the health of your plants.
What is ‘Compost Tea’?
“Compost tea is a liquid extract of compost that contains plant growth compounds and beneficial microorganisms.”
(OSU Extensions Services)
Agriculturists have used liquid extracts and fertilizers for hundreds of years. Solid compost is a great source of beneficial nutrients, but you can only mix it with the soil. This forces the plant to create its own ‘protective barrier’ of microorganisms on its foliage.
 Compost is also difficult to spread over large areas. For the homeowner wanting to fertilize their lawn or trees, it isn’t always the best choice.
Compost tea is the solution to these problems. It allows agriculturists to take the best parts from compost and put them in liquid form. You can easily spray that liquid over an entire plant or lawn.
Generally speaking, there are two types of compost tea: aerated and non-aerated. While we want you to become a compost tea expert, we’re going to take baby steps.
Making aerated compost tea gets complicated (and expensive). For the sake of learning, this post will focus on the simplest method of making compost tea.
Making Farmer’s Tea (Non-aerated Compost Tea)
The process of making Farmer’s Tea resembles that of brewing actual tea. Like the name implies, you make non-aerated compost tea by ‘steeping’ or soaking compost in water.
While your compost is soaking, you’ll need to stir and agitate it by hand. This introduces air into the mixture, allowing colonies of good bacteria, fungi, and yeast to grow in the liquid.
Once the water is saturated with beneficial nutrients and fermented with microorganisms, you want to strain it into a spraying device and apply it to your plants.
That’s an overview of the whole process – start to finish. Now we’ll cover each step in more detail.
Materials Needed
You can pick up all these materials at your local nursery or garden shop.
- Two 5 gallon buckets
- Water source (not chlorinated) *
- Ready-to-use compost (organic and not entirely manure-based) **
- Stick or tool for stirring
- Burlap sack or a large knit cloth bag
- Handheld spray bottle or garden sprayer for application
* Do not use chlorinated water. It will kill the organisms in your tea and contaminate your plants.
** The most important ingredient in your compost tea is the compost. Quality compost contains thriving colonies of microorganisms and helpful plant nutrients. If you start with quality compost, you’ll make a quali-TEA. That is, a quality tea.
Avoid using animal manure compost. These composts don’t contain the same amount of microbial colonies as organic compost. It can also contain E-Coli and other harmful human pathogens.
Step 1
Make sure that your equipment is clean and free of contaminants like pesticides and chemicals. These can kill helpful microorganisms and contaminate your plants.
Step 2
Fill your bucket about half full of compost.
Step 3
Pour water on top of the compost until the bucket is nearly full to the top with water.
Step 4
Let your compost soak in the bucket for at least one day. Some people like to brew their tea for an entire month, but one to eight days is a sufficient amount of time.
You should agitate the mixture with your stirring tool at least twice a day. Stirring introduces oxygen into your liquid and helps bring nutrients into solution. The more often you stir your fermenting tea, the quicker and stronger the beneficial microorganism colonies should grow in your tea.
Note: If you are brewing your tea on a hot day, make sure that you are stirring more often (once an hour). You also want to keep your mixture out of direct sunlight and harmful UV rays.
Step 5
Once your tea has been brewed you should strain the particles out of the solution. For this part of the process, you’ll use your burlap sack or any type of large knit cheesecloth-like material.
Pour the mixture through the cloth into the second 5 gallon bucket. You can reuse the separated compost particles as a soil amender, or throw them into a compost pile.
Using Your Compost Tea
Now that you have successfully brewed and strained your batch of compost tea, you should be left with a particle free, amber colored liquid. If your liquid is very dark, it may be too concentrated and can be diluted by adding extra water until a lighter color is achieved.
Fill your clean handheld spray bottle or garden sprayer with compost tea and water. A general guide to tea dilution is as follows:
- For house plants use a 1:1 (tea to water ratio)
- For larger areas like lawns or trees use a 1:3 (tea to water ratio)
As you begin applying your protective brew teaming with microorganisms to your plants observe the health of the plant to guide how much tea you spray. Sick plants will generally need larger amounts of tea than healthy plants.
When Should You Spray? And How Much?
Whenever you see signs of disease or undernourishment these are good indicators that your plants may need a dose of compost tea.
 Undernourished plants may have yellowing leaves, stunted growth and smaller than normal flowers or fruits. Signs of a fungal disease include wilting foliage, failure to flower or bear fruit, and discolored leaves. Pest problems and other diseases produce many of these symptoms as well.
To use your compost tea, you can spray it on plant foliage (leaves), spray or soak the soil around a plant, or even treat seedlings by dipping their roots into compost tea before planting them.
Medium houseplants require about 2 cups of tea each treatment. For lawns apply tea once or twice a month during growing season, just before or just after regular watering. One gallon of compost tea mixture covers about 1,000 square feet.
If you are seeing signs of disease or undernourishment spray at least once a month, or as often as every other week. If you have healthy plants, spraying once or twice a season can still be beneficial.
Note: Do not spray your plants in direct sunlight or excessive heat. UV rays and extreme temperatures can damage your compost tea.
You may not see immediate changes in your plant health, but be patient. It takes some time for the beneficial microorganisms to grow and proliferate around and on the plant.
Storing Compost Tea
You can only keep and use compost tea for several days after decanting from the original brew.
Compost tea does not keep well for long periods of time because the living microorganisms in the solution will quickly ‘eat’ all of the available food and eventually die. By storing compost tea properly, you can help it stay ‘good’ for several days after decanting.
Store compost tea away from direct sunlight and harmful UV rays. Also, make sure to keep your tea away from extreme temperatures (between 60-90 degrees F).
Do not store your brew in a closed container. Natural biological and chemical reactions can create pressure and cause a sealed container to burst.
Cautions With Compost Tea
 Do not apply compost tea to any vegetable within 3 weeks of the planned harvest date. Compost tea can contain some human pathogens and should not be ingested or introduced into the body.
Also, not fully matured compost can contain E. coli. Make sure your compost is fully broken down to help ensure that no unwanted pathogens are introduced into your compost tea.
Creating quality, fully matured compost is a very complex subject that we will explore in a different post. Until then, here is a link to making quality compost.
Beautiful Blooms & Green Gardens
Now that you know how to brew amazing compost tea and properly spray your struggling plants, all you have left to do is sit back and enjoy the fruits of your labor.
Soon you will have jealous neighbors complimenting your gardening prowess and begging for your growing secrets.
Have you ever made compost tea before? We’d love to hear about your personal tea recipes and success stories in the comments section.
Sources: